Roof Sheathing Flush With Fascia

Installing Soffit And Fascia Fascia Board Fascia Roof Sheathing

Air Sealing Sip Seams Roof Insulation Roofing Structural Insulated Panels

Image Result For Purlins Vs Osb Sheathing Osb Sheathing Sheathing Osb

Sub Fascias Are Not Required By Code The Fascia Can Be Nailed Directly To The Truss Tails But While The Sub Fascia Is Typical Submarine Fascia Floor Plans

Drip Edge Detail Rigid Insulation Drip Edge Fascia

Drip Edge And The Irc Jlc Online

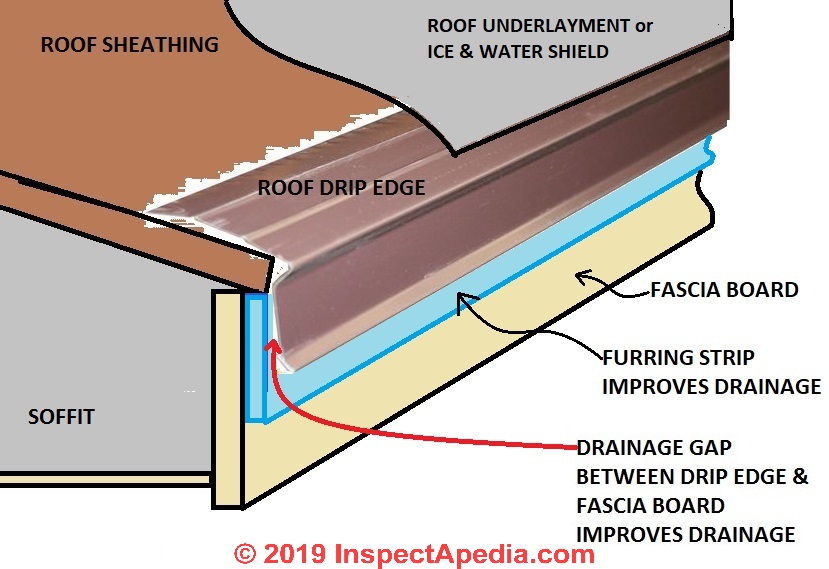
The drip edge will be installed 1 8 proud of away or out from the furring strip in best practice or may be installed tight against the furring strip reduces the life of the furring strip by rot.
Roof sheathing flush with fascia.

Vinyl Gutter Woes Shingles Home Depot Installing Flush House Remodeling Decorating Construction Energy Use Kitchen Vinyl Gutter Shingling Drip Edge

Follow These Recommendations To Save Money When Installing Soffit Roof Soffits Vinyl Siding Installation Roof

Image Result For Gutter To Boundary Wall Detail Boundary Walls House Extension Design Roof Detail
Https Www Habitatmidohio Org File Download 3b8c8e13 5e17 4d63 B5e6 199874c4c03e

How To Install Eave Fascia Metal Roofing Trim Metal Roof Installation Metal Roof Over Shingles Standing Seam Metal Roof

Tula House Patkau Architects Arch2o Com Architect Architectural Section Architecture Details

Roof Soffits And Fascia At Duckduckgo Roof Soffits Roof Repair Gutters

Pin On Projects To Try
Roof Drip Edge Flashing Requirements Recommendations

Reroofing Over Zip System Sheathing Roofing Reroofing Building A House

Installing Soffit Where There Is No Previously Existing Soffit Or Previously Existing Soffit Has Been Re Vinyl Siding Installation Siding Soffit House Exterior

Roof Edge Help Please Roofing Siding Diy Home Improvement Diychatroom

Roof Coping Definition Exceptional Roofing Sheathing Plywood Overhang Fascia Thickness Sc 1 St Books And Boardies Sheathing Plywood Plywood Plywood Thickness

Simple And Ridiculous Tricks Can Change Your Life Roofing Design Traditional Roofing Design Solar Power Cedar Shingle Roof Installing Shingles Cedar Shingles

Framing Tip Placing Roof Sheathing Snap A Line With Fascia In Mind Protradecraft

Moisture Damage Was Discovered At The F28 Fascia 2 8 The Base Of The Garage Door Jambs Remove All Damaged W Matching Paint Colors Exterior Wood Wood Repair

Smart Flat Roofs The Craft Of Parapet Detailing Build Blog Flat Roof Membrane Roof Parapet

How To Install Sub Fascia And Roof Sheathing Pole Barn Shop Build Part 11 Youtube
Https Encrypted Tbn0 Gstatic Com Images Q Tbn 3aand9gcqqcrdh6vohwawlyaktid5tlsxx 5zhdi Vbyasrru Usqp Cau

Pin By Calvin Hughes On Roof Windows Cedar Shingles Cedar Shakes Roof Window

Whether You Choose A Timber Framed Base Or A Concrete Slab Either One Can Be Constructed Yourself Or By A Contractor Shed Plans Tool Sheds Shed

Pin On Diy And Crafts

Tamlin International Homes Ltd Gallery Project Photos With Images Timber Frame Roof Sheathing Roof Trusses

Common Roofing Errors Jlc Online Roofing Roof Underlayment Roofingshingles Roofrepair Roof Installation Roof Shingles Fibreglass Roof
Source : pinterest.com
